What is DTF white ink, and why does it matter?
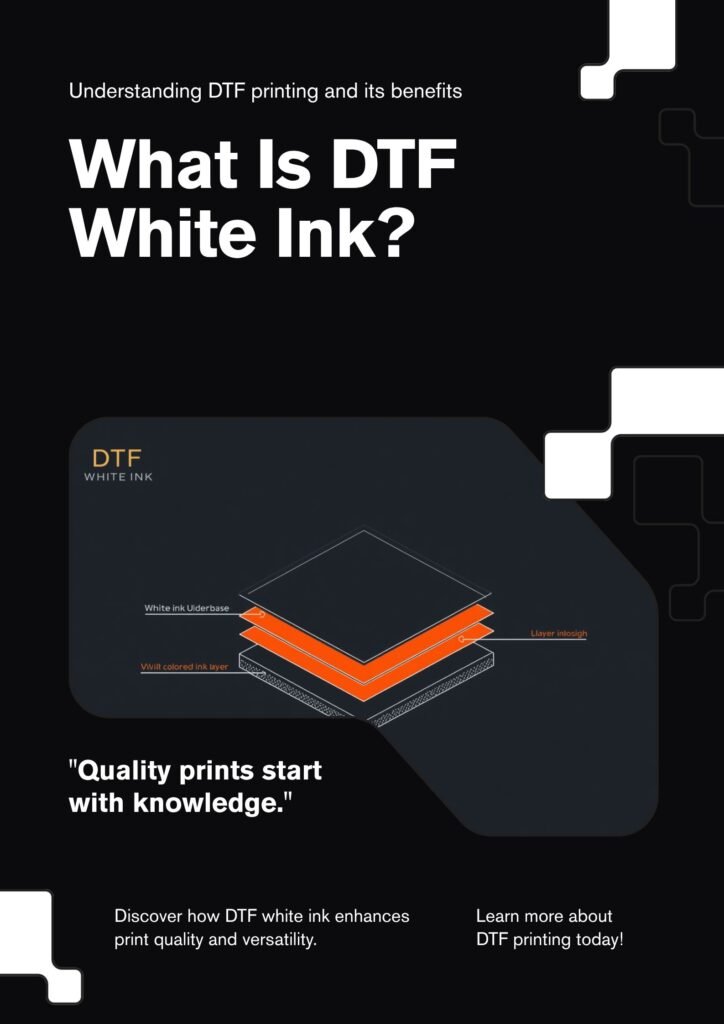
DTF white ink is a dedicated ink channel — separate from the CMYK color inks — built around titanium dioxide (TiO₂) as its pigment, printed as an underbase layer beneath your design so colors show up opaque and accurate on any fabric color instead of blending invisibly into dark garments. It’s the single most technically demanding ink in a DTF system, and it’s responsible for more finished-transfer defects — fading, patchiness, halos, dull colors — than every other part of the process combined.
This guide goes deep specifically on DTF white ink: what makes it chemically different from CMYK ink, why it settles faster than anything else in your printer, how the underbase actually gets generated from your artwork, the real fixes for the most common white ink problems, and the maintenance habits that separate a shop with consistent opacity from one that fights patchy prints every week. For the general ink chemistry behind DTF ink as a whole — viscosity, particle size, shelf life — see What Ink Is Used for DTF Printing?. For the full production sequence this white ink layer fits into, see How Are DTF Transfers Made?.
What Makes DTF White Ink Different From CMYK Ink?
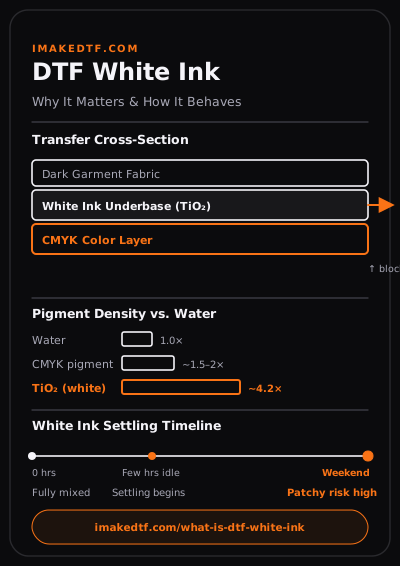
Every other ink channel in a DTF printer — cyan, magenta, yellow, black — uses relatively light, evenly dispersed organic pigments. White DTF ink uses titanium dioxide, a mineral-based pigment with a specific gravity of roughly 4.2 g/cm³ — about four times denser than water, and meaningfully denser than the pigments in CMYK ink. That single density difference explains almost everything else in this guide: TiO₂ particles are heavier than the liquid carrier suspending them, so gravity pulls them downward continuously, even while the printer sits idle for what feels like a short break.
This isn’t a defect in any particular ink brand — it’s a physical property of the pigment itself, which is why dtf white ink management is a universal DTF skill rather than a brand-specific troubleshooting step. Cheaper white inks with poorly milled or unevenly sized TiO₂ particles settle faster and more unevenly than well-formulated ones, which is one real, measurable difference between a budget ink and a premium one — but no DTF white ink is immune to settling. The difference is only ever a matter of how many hours you have before it becomes a visible problem.
Why DTF White Ink Is the Foundation of DTF Print Quality
Without a white underbase, your CMYK colors print as a semi-transparent layer that blends with whatever’s underneath them. On a white T-shirt this barely matters. On a black hoodie, a navy hat, or a heather-gray crewneck, it’s the difference between a design that pops and one that looks washed out and muddy — the fabric color shows through every color you printed on top of it.
The white layer does three separate jobs at once, and it’s worth naming all three because most explanations only mention the first:
Opacity — blocking the garment color so CMYK inks read as true colors rather than tinted versions of the fabric underneath.
Color accuracy — a red only stays the same red across a white tee, a black hoodie, and a heather-gray crewneck if the white underbase underneath it is consistently opaque. Inconsistent white ink is the most common reason a design that “matched perfectly” on one shirt color looks noticeably different on another.
Edge definition — a properly generated white layer holds sharp edges under the design; an under-printed or poorly choked white layer produces soft, blurry, or halo’d edges regardless of how sharp the CMYK artwork actually is.
DTF White ink opacity directly affects how accurate your printed colors look against your original design file. Our Color Match Checker shows how a color will actually render once the white underbase and garment color are factored in — before you press anything.
How the White Underbase Actually Gets Generated
This is the part most DTF white ink guides skip entirely, and it’s exactly the kind of detail worth understanding if you want to fix opacity problems instead of guessing at them. DTF White ink isn’t printed as a flat, solid block behind your entire design by default. Your RIP software generates the white layer algorithmically, based on the shape, transparency, and opacity values in your actual artwork file.
That means a design with soft edges, low-opacity layers, or semi-transparent elements in the source file will generate a white underbase that mirrors those same weak spots — even if the design looks fully solid on your screen. A logo with a subtle drop shadow set to 40% opacity, for instance, will print with roughly 40% DTF white ink density in that shadow area, and on a dark shirt that area will look visibly faded compared to the rest of the design, not because anything went wrong in the printer, but because the file told the RIP software to print it that way. This is the single most under-discussed cause of “faded white ink” complaints — the fix isn’t a printer setting, it’s flattening transparency and checking opacity values in the design file before it ever reaches the printer.
Once the white layer is generated from the artwork, the RIP applies a choke setting — a slight inward contraction of the white layer relative to the CMYK layer above it, usually by a pixel or two. Choke exists specifically to prevent white halos: without it, tiny registration shifts between the white pass and the color pass cause a thin ring of DTF white ink to peek out around the edges of the design. Too much choke, and detailed line art loses definition; too little, and every dark-garment print gets a faint white outline. Getting choke dialed in for your specific printer and film combination is a one-time calibration that pays off on every single print afterward.
Why DTF White Ink Settles Faster Than You Think
Because TiO₂ is roughly four times denser than the ink’s liquid carrier, it doesn’t need days to settle — meaningful separation begins within just a few hours of the printer sitting idle. A printer left overnight, or worse, over a weekend, gives those particles 12 to 60+ hours to sink toward the bottom of the cartridge or ink line, well past the point where a quick shake fully re-suspends them.
This has a direct, mechanical consequence in the ink lines themselves that’s rarely explained clearly: settled TiO₂ doesn’t just sit passively at the bottom of a tank, it accumulates at the lowest points of the tubing and around the print head’s damper — the small chamber that regulates ink flow right before it reaches the nozzles. Over repeated idle periods, that accumulation builds into a partial blockage that shows up as a nozzle that “mostly” fires but delivers inconsistent volume, which reads visually as patchy, streaky white coverage rather than a fully clogged nozzle. This is why some patchy-white problems don’t resolve with a standard nozzle cleaning cycle — the buildup is downstream of the nozzle, in the damper and tubing, and needs a deeper flush or a manual line clean to actually clear.
Active vs. Passive White Ink Circulation
There are two fundamentally different approaches to managing this settling problem, and which one your setup uses changes your entire maintenance routine.
Active circulation uses a small pump that continuously moves DTF white ink through the supply line — including while the printer is powered on but idle, and on some systems, even in a low-power sleep mode. This is the closest thing to a “set it and forget it” solution: the ink never gets the uninterrupted stillness it needs to separate meaningfully, which is why printers with active circulation can often sit over a weekend with the machine left plugged in and powered, running scheduled background agitation cycles, without the dramatic opacity loss a passive system would show on Monday morning.
Passive circulation has no pump — it depends entirely on the operator manually shaking the DTF white ink container or running a manual agitation cycle before printing. The correct technique matters more than most people realize: shake the container end-over-end for 30 to 60 seconds, not side-to-side. End-over-end motion actually lifts settled particles off the bottom and redistributes them through the full volume of ink; side-to-side shaking mostly just rocks the settled layer in place without meaningfully re-suspending it — a common reason operators report “I shook it and it’s still patchy.”
A Practical DTF White Ink Maintenance Schedule
Beyond just shaking or circulating, three specific habits catch most DTF white ink problems before they reach a finished garment:
Daily nozzle check, even on days you don’t print. Printing a nozzle test pattern — or a small solid white swatch — daily keeps ink actively moving through every nozzle and reveals a partial clog while it’s still a minor issue rather than a full print run of patchy shirts.
A weekly full-opacity swatch test. Print the same solid white square on the same scrap film weekly and compare it side by side against last week’s. Opacity drift is gradual and easy to miss day-to-day, but a week-over-week visual comparison catches a slowly worsening white layer before customers start noticing it in finished orders — a habit almost no competitor guide mentions, but one that catches degradation while it’s still cheap to fix.
Environmental control. White ink performs most consistently in a room held around 20–25°C (68–77°F) with 40–50% relative humidity. Cold rooms increase viscosity and make settled TiO₂ harder to fully re-suspend even with correct shaking technique; overly dry air increases the risk of ink drying at the nozzle tips during idle periods, compounding whatever settling has already occurred.
White ink opacity requirements vary by fabric — some materials need a fuller underbase than others to look right. Our Fabric Compatibility Checker covers 14 common fabric types and flags which ones are more opacity-sensitive before you press.
Diagnosing the Most Common White Ink Problems
Faded or grayish prints on dark garments — first check the artwork file for low-opacity layers or soft-edged transparency before assuming a printer issue; if the file is clean, the white ink density setting in the RIP may need to be raised, or the design may need a double-pass white underbase for full opacity on very dark or heavily textured fabric.
Patchy or streaky white coverage — almost always a partial nozzle or damper obstruction from settled TiO₂; run a deeper manual line clean rather than repeating a standard nozzle cleaning cycle if the standard cycle hasn’t resolved it after two attempts.
A visible white halo or outline around the design — a choke calibration issue, not an ink quality issue; tighten the choke setting slightly so the white layer sits a pixel or two inside the CMYK layer’s edges.
Colors that don’t match between different garment colors — the white underbase opacity is inconsistent between prints, which is the most common reason a color that looked correct on a white sample shirt looks off on a black one; verify the printer’s white ink density setting rather than adjusting the CMYK color values, since adjusting color to compensate for an opacity problem creates a mismatch on every other fabric color.
Colors that don’t match your screen at all, regardless of garment color — this is a separate issue from white ink opacity, tied to your printer’s overall color profile rather than the white layer; our DTF ink guide covers ink-and-profile mismatches in more depth.
White Ink and Wash Durability
It’s worth separating two things that are easy to conflate: white ink opacity affects how a print looks, while wash durability depends primarily on curing and heat press settings, not the white ink layer itself. A transfer with a beautifully opaque white underbase can still peel early if it was pressed at the wrong temperature or time for the fabric — see our full heat press settings guide for fabric-specific charts. That said, an under-printed white layer that required a double pass to reach adequate opacity does add slightly more total ink and powder to the transfer, which is one more reason to get the density setting right the first time rather than compensating with repeated passes as a workaround.
Buying Transfers? What to Ask About DTF White Ink
If you’re sourcing finished transfers rather than printing your own, you can’t inspect a supplier’s white ink circulation setup directly — but the finished product tells you almost everything. Request a small sample pressed onto a dark garment and check specifically for even, opaque coverage with no patchiness and no visible halo around the edges. A supplier producing consistently opaque whites across a batch is very likely running active circulation or strict manual agitation discipline; visible inconsistency between individual transfers in the same order is a reliable sign their white ink management isn’t consistent, regardless of what ink brand they claim to use.
When you’re printing multiple designs on one sheet, uneven white ink opacity across different areas of a large gang sheet is more noticeable than on a single small transfer. Our Gang Sheet Builder helps you lay out designs efficiently so opacity issues are easier to catch during a quick visual check before pressing.
Frequently Asked Questions
Why does my DTF white ink look fine in the cartridge but print faded?
The ink itself may be adequately mixed while the print settings or artwork file are the actual problem — check for low-opacity or semi-transparent layers in your design file first, since the RIP generates the white layer directly from those values regardless of how well-mixed the ink is.
How often should I shake or circulate DTF white ink?
With passive (manual) systems, shake end-over-end for 30–60 seconds before any printing session, and again after any idle period longer than a few hours. With active circulation systems, the pump handles this automatically, but it’s still worth confirming the circulation cycle is actually running rather than assuming it is.
Can I leave my DTF printer off over the weekend without DTF white ink problems?
It’s risky. Settling begins within hours, and a fully powered-off weekend gives TiO₂ far more time to separate than most manual agitation on Monday morning can fully reverse. Printers with active circulation are usually safe to leave powered on in sleep mode over a weekend; passive systems are better off with a scheduled agitation cycle run manually before the printer sits idle for more than a day.
Does more expensive white ink mean less settling?
Better-formulated white inks with more evenly milled TiO₂ particles do settle somewhat more slowly and more evenly than poorly formulated ones, but no DTF white ink is immune to settling — it’s a property of titanium dioxide itself, not a solvable formulation flaw. Circulation and maintenance discipline matter regardless of which ink brand you use.
Why does the same design look different in color between a white shirt and a black shirt?
This is normal to a degree — the white underbase interacts differently with different garment colors — but a large, noticeable difference usually points to inconsistent white ink density between those two prints rather than an unavoidable limitation, and it’s worth checking opacity consistency before assuming it’s simply how DTF works.