DTF Heat Press Settings Guide — Every Fabric, Every Transfer
Getting your DTF heat press settings right is the single biggest factor in whether a transfer bonds for good or peels off in the wash. Too cold, and the adhesive never fully activates — it looks fine on day one and lifts at the edges by wash three. Too hot, and you scorch the garment, cause dye migration on synthetics, or crack the print before it ever leaves your press table. Everything else — the artwork, the film quality, the printer — is wasted if the press settings are wrong.
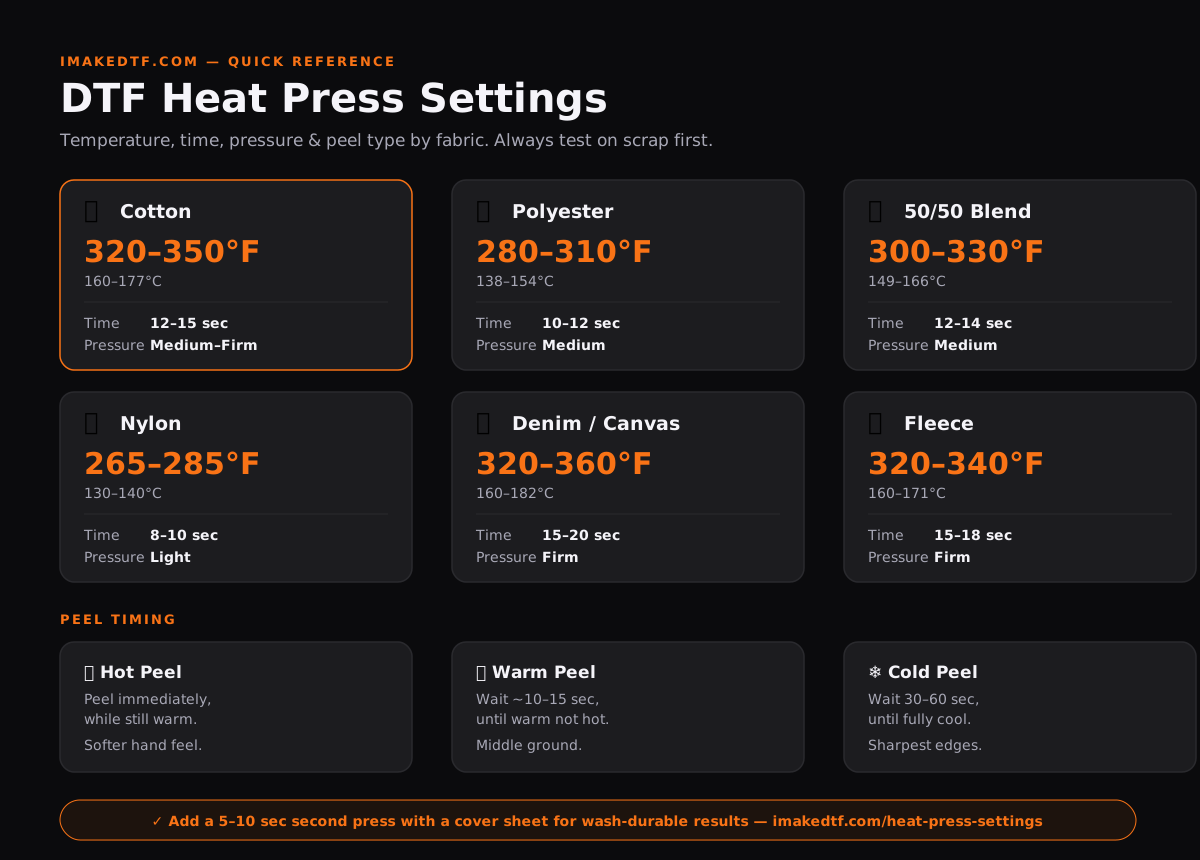
The quick answer: for a standard cotton garment on a commercial heat press, use 320–350°F (160–177°C), medium-to-firm pressure, for 12–15 seconds, then peel according to your film type. Everything below adjusts that baseline for your exact fabric, equipment, and film — plus the fixes for when a press “looks right” but the transfer still fails.
DTF Heat Press Settings by Fabric: Full Temperature Chart
Fabric composition is the single biggest variable in DTF heat press temperature selection. Synthetic fibers scorch, melt, or dye-migrate at temperatures cotton handles easily — so “one setting for everything” is exactly how garments get ruined. Use the chart below as your starting point, then always test on a scrap or hidden seam before running a full batch. This matches the exact values used in our heat press settings tool above, so the numbers here and the calculator stay in sync no matter which fabric you look up.
| Fabric | Temp (°F) | Temp (°C) | Time | Pressure | Peel |
|---|---|---|---|---|---|
| Cotton | 320–350 | 160–177 | 12–15s | Medium–Firm | Hot/Warm/Cold |
| Polyester | 280–310 | 138–154 | 10–12s | Medium | Hot/Warm/Cold |
| Cotton/Poly Blend (50/50) | 300–330 | 149–166 | 12–14s | Medium | Hot/Warm/Cold |
| Nylon | 265–285 | 130–140 | 8–10s | Light | Hot/Warm/Cold |
| Leather / Pleather | 300–320 | 149–160 | 10–12s | Light | Hot/Warm/Cold |
| Fleece | 320–340 | 160–171 | 15–18s | Firm | Warm/Cold |
| Canvas | 320–350 | 160–177 | 15–18s | Firm | Hot/Warm/Cold |
| Denim | 330–360 | 166–182 | 15–20s | Firm | Hot/Warm/Cold |
| Spandex / Lycra | 260–280 | 127–138 | 8–10s | Light | Hot/Warm |
| Rayon | 290–310 | 143–154 | 10–12s | Light–Medium | Warm/Cold |
Two fabrics that trip up almost everyone and rarely make it into other DTF pressing guides:
Silk and satin — treat these like an extreme version of nylon. Stay at 250–270°F, light pressure only, and always use a Teflon or parchment cover sheet even on the first press. These fibers scorch and water-mark at temperatures that barely register on cotton.
Moisture-wicking / performance polyester (running shirts, gym wear) — these often have a DWR (durable water repellent) or moisture-wicking coating that behaves differently from plain polyester. Drop 10–15°F below the standard polyester range and always test first — the coating can prevent adhesion entirely regardless of temperature. If you’re not sure a fabric will take DTF at all before you burn a transfer on it, run it through our fabric compatibility checker first.
Hot Peel vs. Cold Peel: Why the Difference Matters More Than Temperature
Peel type isn’t a preference — it’s a property of the film your supplier used, and pressing at the right temperature but peeling at the wrong moment is one of the most common reasons a transfer that “should have worked” fails anyway.
Hot peel film is designed to have the carrier film removed immediately, while the transfer is still warm and the adhesive is still slightly fluid. This produces a softer hand feel and is the most common type shipped by commercial DTF suppliers. Peel slowly, at a low angle, right after lifting the press.
Cold peel film needs the opposite: let the garment cool to the touch — usually 30–60 seconds — before removing the film. Peeling cold-peel film too early lifts the ink with it. Cold peel generally gives sharper edges and slightly more vibrant color because the adhesive fully cures before the film separates.
Warm peel sits in between and is common with mid-tier film — wait roughly 10–15 seconds, until the film is warm but no longer hot, before peeling.
If you don’t know which type you have, check your supplier’s packing slip or product page — reputable suppliers always specify it. When genuinely in doubt, cold peel is the safer default: waiting too long on a hot-peel film costs you nothing, but peeling a cold-peel film too early can ruin the print.
Settings by Equipment: Heat Press, Handheld Press, and Iron
Clamshell / Swing-Away Heat Press (recommended)
A commercial heat press is the standard for DTF for one reason: even pressure and consistent temperature across the entire platen, which is exactly what the adhesive layer needs to bond uniformly. Baseline: 320–350°F, medium-to-firm pressure, 12–15 seconds.
Pressure in practical terms: on a manual clamshell press, you should feel firm resistance when closing — enough that it takes real effort, not a light click-shut. On a pneumatic/air-operated press, that translates to roughly 40–60 PSI for the first press. If the platen closes with almost no resistance, you’re under-pressuring and that’s very often the real cause of “my settings are right but it’s still peeling.”
Handheld Press (Cricut EasyPress, HTVRONT, similar)
Handheld presses work for DTF but need more attention than a platen press — smaller surface area means larger transfers must be pressed in overlapping sections, and you’re applying pressure by hand instead of a calibrated clamp. Recommended: 320°F, 20 seconds per section, firm and even downward pressure, overlapping each section slightly so you don’t leave a cold seam line down the middle of the design.
If a transfer isn’t bonding, raise temperature in 15°F increments — never jump 30–50 degrees at once, or you’ll scorch the fabric before you’ve isolated the actual problem.
Household Iron (last resort)
An iron is the least reliable option — uneven heat distribution, no accurate temperature readout, and steam holes that create inconsistent pressure across the soleplate. If it’s genuinely your only option: place parchment paper between the iron and the transfer, apply hard constant pressure for at least 20 seconds per section, verify actual surface heat with a separate infrared thermometer (the dial is not trustworthy), and turn the steam function off completely — any moisture interferes with adhesion.
| Equipment | Temperature | Time | Notes |
|---|---|---|---|
| Heat press — cotton | 320–350°F | 12–15 sec | Medium–firm, ~40–60 PSI on pneumatic presses |
| Heat press — polyester | 280–310°F | 10–12 sec | Medium pressure, watch for dye migration |
| Handheld press | 320°F | 20 sec/section | Overlap sections to avoid cold seams |
| Iron | Verify w/ IR thermometer | 20+ sec/section | No steam, use parchment paper |
| Heavy fabric (denim, canvas, fleece) | Standard range +0°F | +3–5 sec | Add time before adding heat |
The Second Press: The Step Most Guides Skip
This is the single highest-leverage step for wash durability, and it’s the one most DTF guides mention only in passing (or skip entirely). After your initial press and peel, lay a Teflon sheet or parchment paper over the design and press again for 5–10 seconds at the same temperature, medium pressure. This “post-press” or “second press” pushes the adhesive deeper into the fabric fibers, flattens the print for a smoother hand feel, and seals the edges — the exact spot where peeling almost always starts. If you’re already fighting edge lift on a design, this one extra step fixes it more often than raising the temperature does.
Common Mistakes: Diagnose by Symptom
Most “my DTF settings aren’t working” problems trace back to one of four variables. Use the symptom to find the fix instead of guessing at a new temperature:
| Symptom | Likely Cause | Fix |
|---|---|---|
| Peels within the first few washes | Temperature too low, or press time too short | Add 10°F and 2–3 seconds; add a second press with a cover sheet |
| Edges lift first, center holds | Uneven or insufficient pressure | Increase pressure; check the press closes firmly across the whole platen, not just the center |
| Scorched fabric or shiny/melted spot | Temperature too high for that fabric | Drop 15–20°F, retest on scrap before the next full press |
| Color bleeding around the design edges | Dye migration — temperature too high for a synthetic | Drop temperature toward the low end of the fabric’s range; this is common on 100% polyester over 310°F |
| Print lifts off with the film during peel | Peeled too early (cold peel) or waited too long (hot peel) | Lay the film back down, re-press 5–8 seconds, then peel with correct timing for your film type |
| Stiff, plasticky, or cracked hand feel | Over-pressing — too much time or heat, not too little | Reduce time by 2–3 seconds rather than adding more; a second short press beats one long first press |
Special Cases
Dark and Black Garments
DTF transfers for dark fabrics include a white ink underbase printed beneath the color layer so the design shows up instead of the garment color bleeding through. This underbase is thicker than a standard print, so dark-garment transfers can need 1–2 extra seconds of press time at the same temperature to fully bond that additional ink layer — don’t compensate with extra heat, compensate with extra time.
Neck Labels and Small Items
Small pieces like neck labels lose heat to the surrounding platen faster than a full chest print does, so they often need slightly firmer, more concentrated pressure to bond evenly at the same temperature. If you’re adding branded neck labels to an order, our neck label generator creates print-ready labels sized to go straight onto the same gang sheet as your main design — same press pass, no separate setup.
Gang Sheets with Mixed Designs
When you’re pressing a sheet that came from a gang sheet builder with multiple designs on one film, remember that press settings should match the most heat-sensitive fabric or thinnest design on that run — not the average. If you’ve batched a polyester-bound design onto the same sheet as a cotton one, press at the polyester temperature; cotton tolerates the lower end of its range just fine, but polyester won’t tolerate the cotton range at all.
After the Press: Cure Time and Wash Care
A correctly pressed DTF transfer can hold up for 50–100 wash cycles without cracking or fading — but only if it’s given time to cure and washed correctly afterward:
- Wait at least 24 hours before the first wash. The adhesive continues to cure after pressing, and an early wash is one of the most common causes of “it peeled after just one wash.”
- Wash inside-out in cold water. This protects the print surface from direct friction against other garments.
- Tumble dry on low, or air dry. High dryer heat is the single biggest cause of premature cracking and peeling after the transfer has otherwise been applied correctly — it’s effectively re-heating an already-cured print without any pressure to hold it flat.
- Never iron directly over the print. If touch-ups are needed, iron the garment inside-out or avoid the printed area entirely.
Quick-Reference Summary
For most DTF applications on a standard heat press: 320–350°F, medium-to-firm pressure, 12–15 seconds, then peel according to your film type. Go lower and gentler for synthetics, higher and longer for heavy natural fibers, and always finish with a second press through a cover sheet if wash durability matters for the order. When a setting seems off, change one variable at a time — temperature, then time, then pressure — and retest before moving a full batch through.
Once your fabric and film are known, use the calculator at the top of this page to get the exact numbers instantly instead of cross-referencing a chart every time — and if you’re pricing out an order once your settings are dialed in, the DTF price calculator and platform fee calculator will tell you what to charge so a bad batch doesn’t eat your margin.